AI Assistant
The AI Assistant is a chat-based interface for AI-assisted semantic model development designed to help you create semantic models faster. With an enterprise-ready design, full control of what is sent to the AI, and built-in consent management, you can use the AI Assistant with confidence. The AI Assistant has undergone independent security penetration testing. For details, visit the Tabular Editor Trust Center. It can explore your model metadata, write and execute DAX queries, generate C# scripts, run Best Practice Analyzer checks, query VertiPaq Analyzer statistics and search the Tabular Editor knowledge base.
The AI Assistant uses a bring-your-own-key model. You provide an API key from one of the supported providers and the assistant runs directly against that provider's API.
There is a second way in that needs no key at all. From 3.27.0 Tabular Editor 3 can act as an MCP server, so an agent you already subscribe to, such as Claude Code, GitHub Copilot, VS Code agent mode, Codex or Cursor, works on the open model through the same tools and the same permissions as the chat. See MCP Server. The two share one permission record, so whichever you use, you set the boundaries once.
Note
The AI Assistant is in public preview starting with Tabular Editor 3.26.0. We welcome feedback on the experience as we continue to refine it.
Getting Started
- Open Tools > Preferences > AI Features > AI Assistant
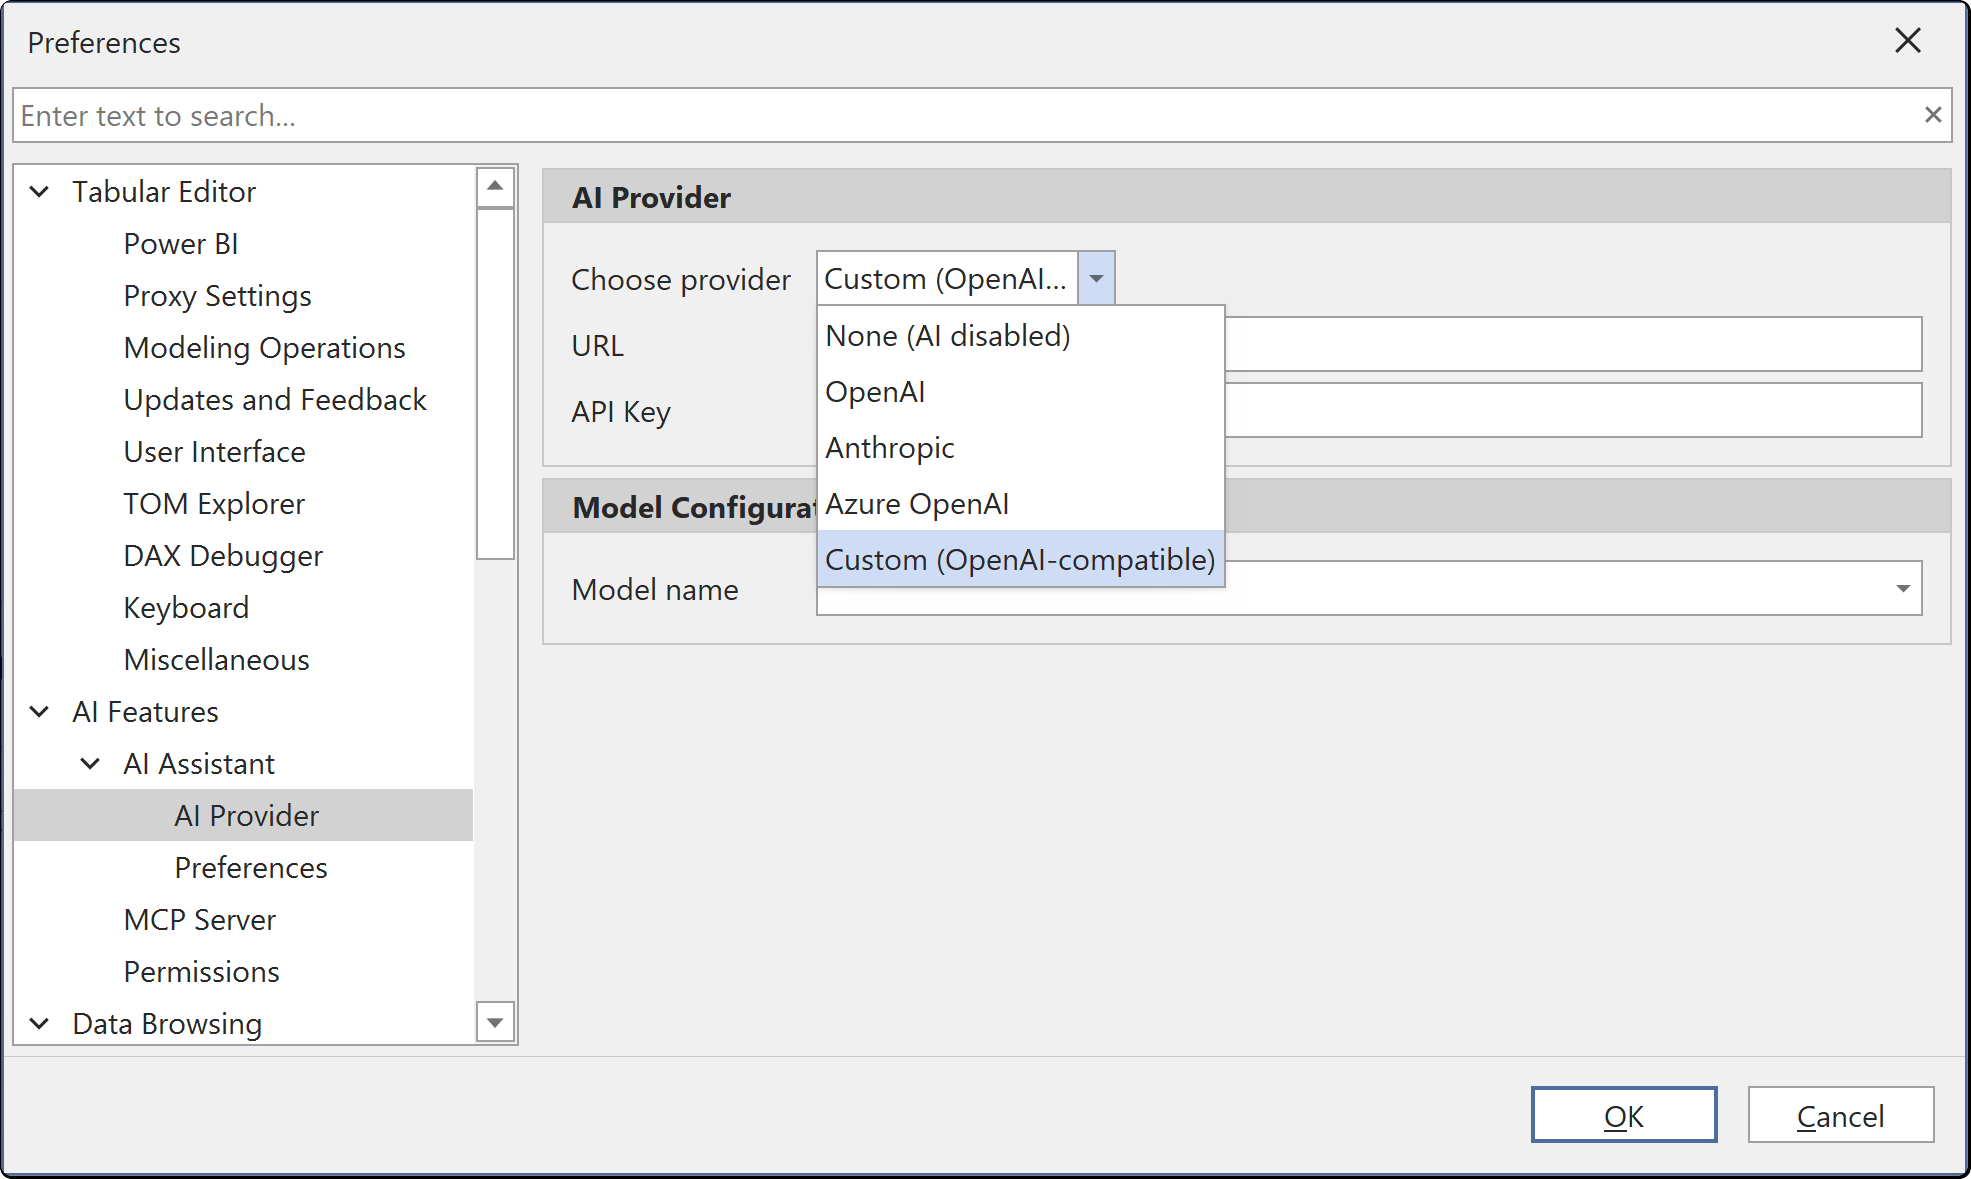
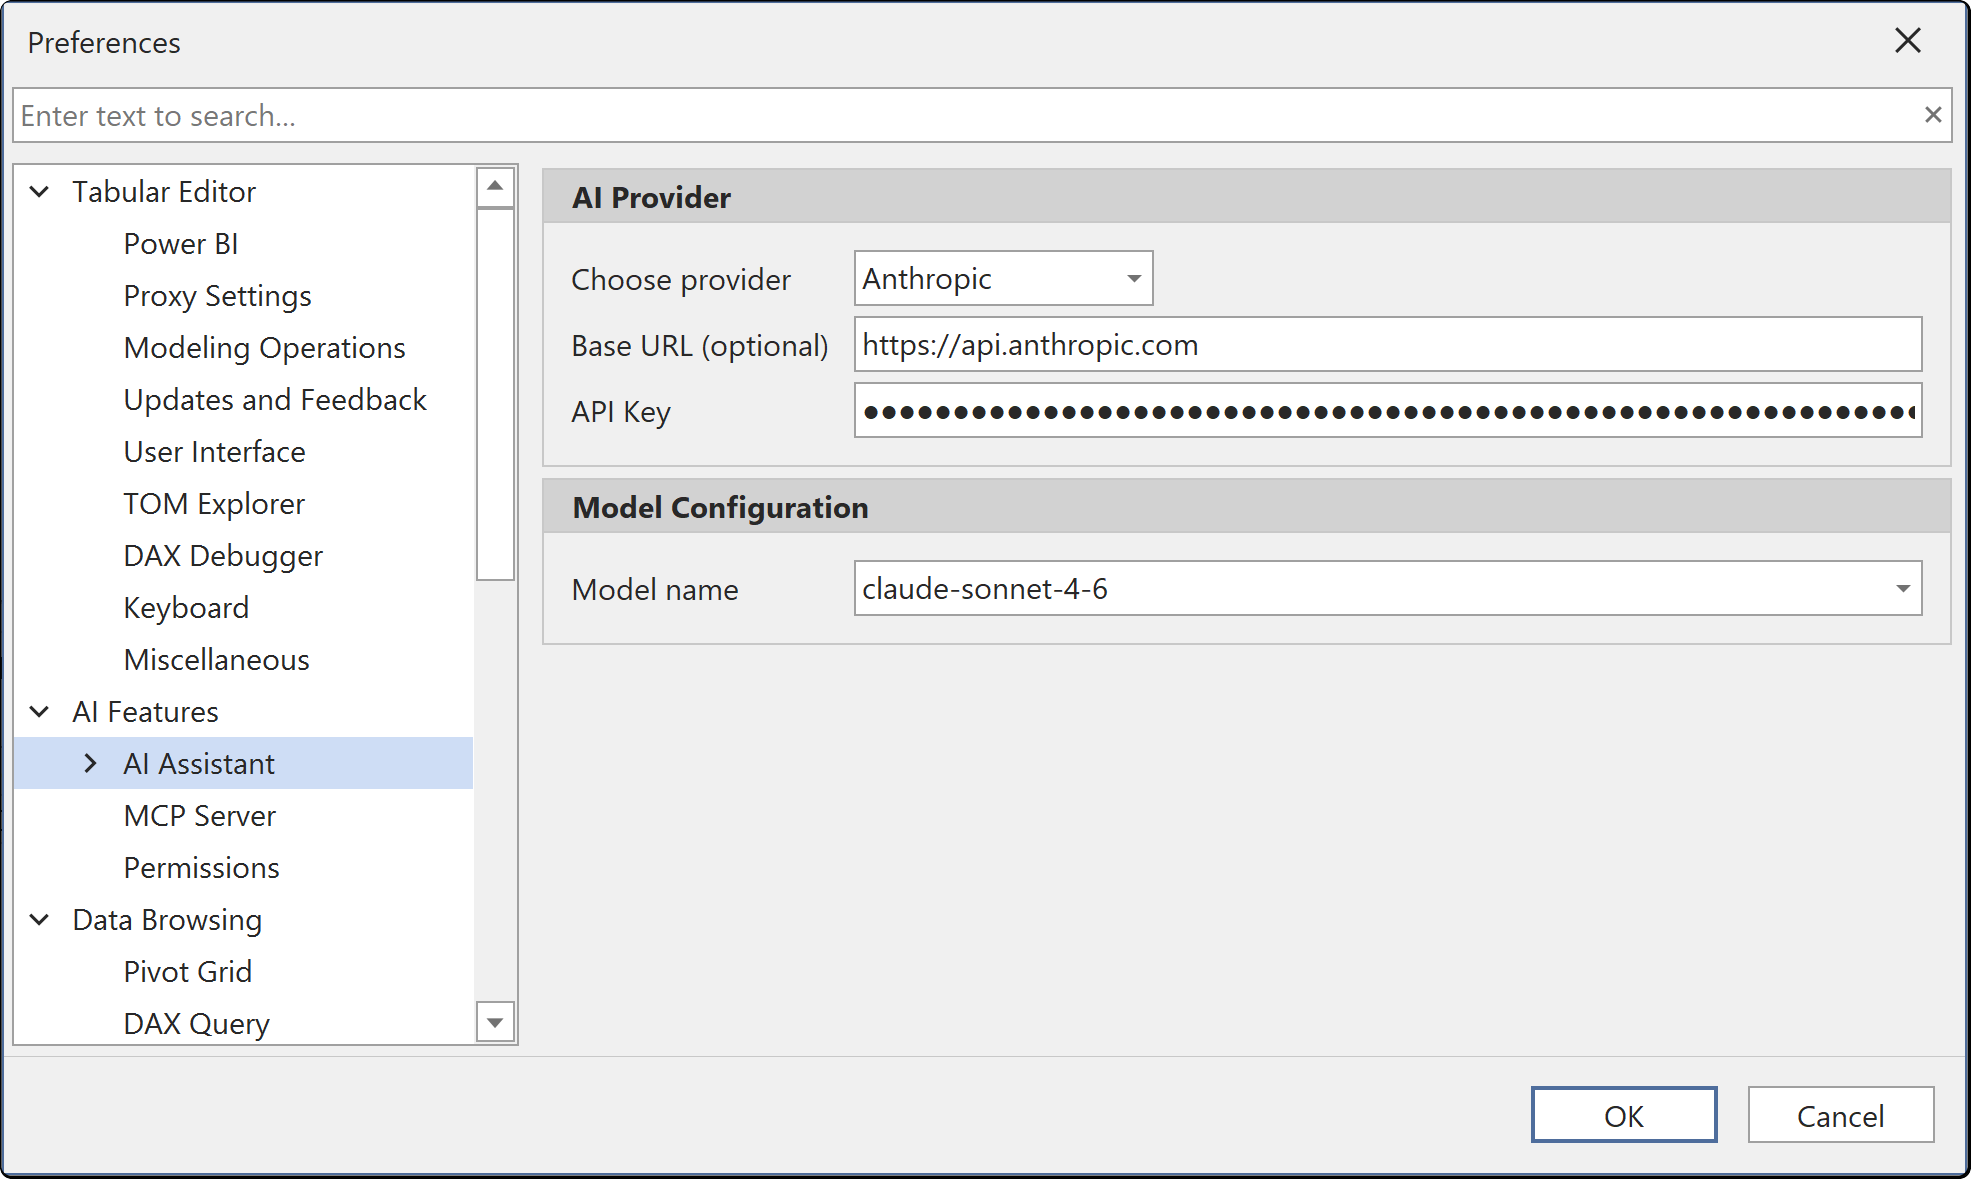
- Select your AI provider (on a fresh install this defaults to None (AI disabled)), then enter your API key
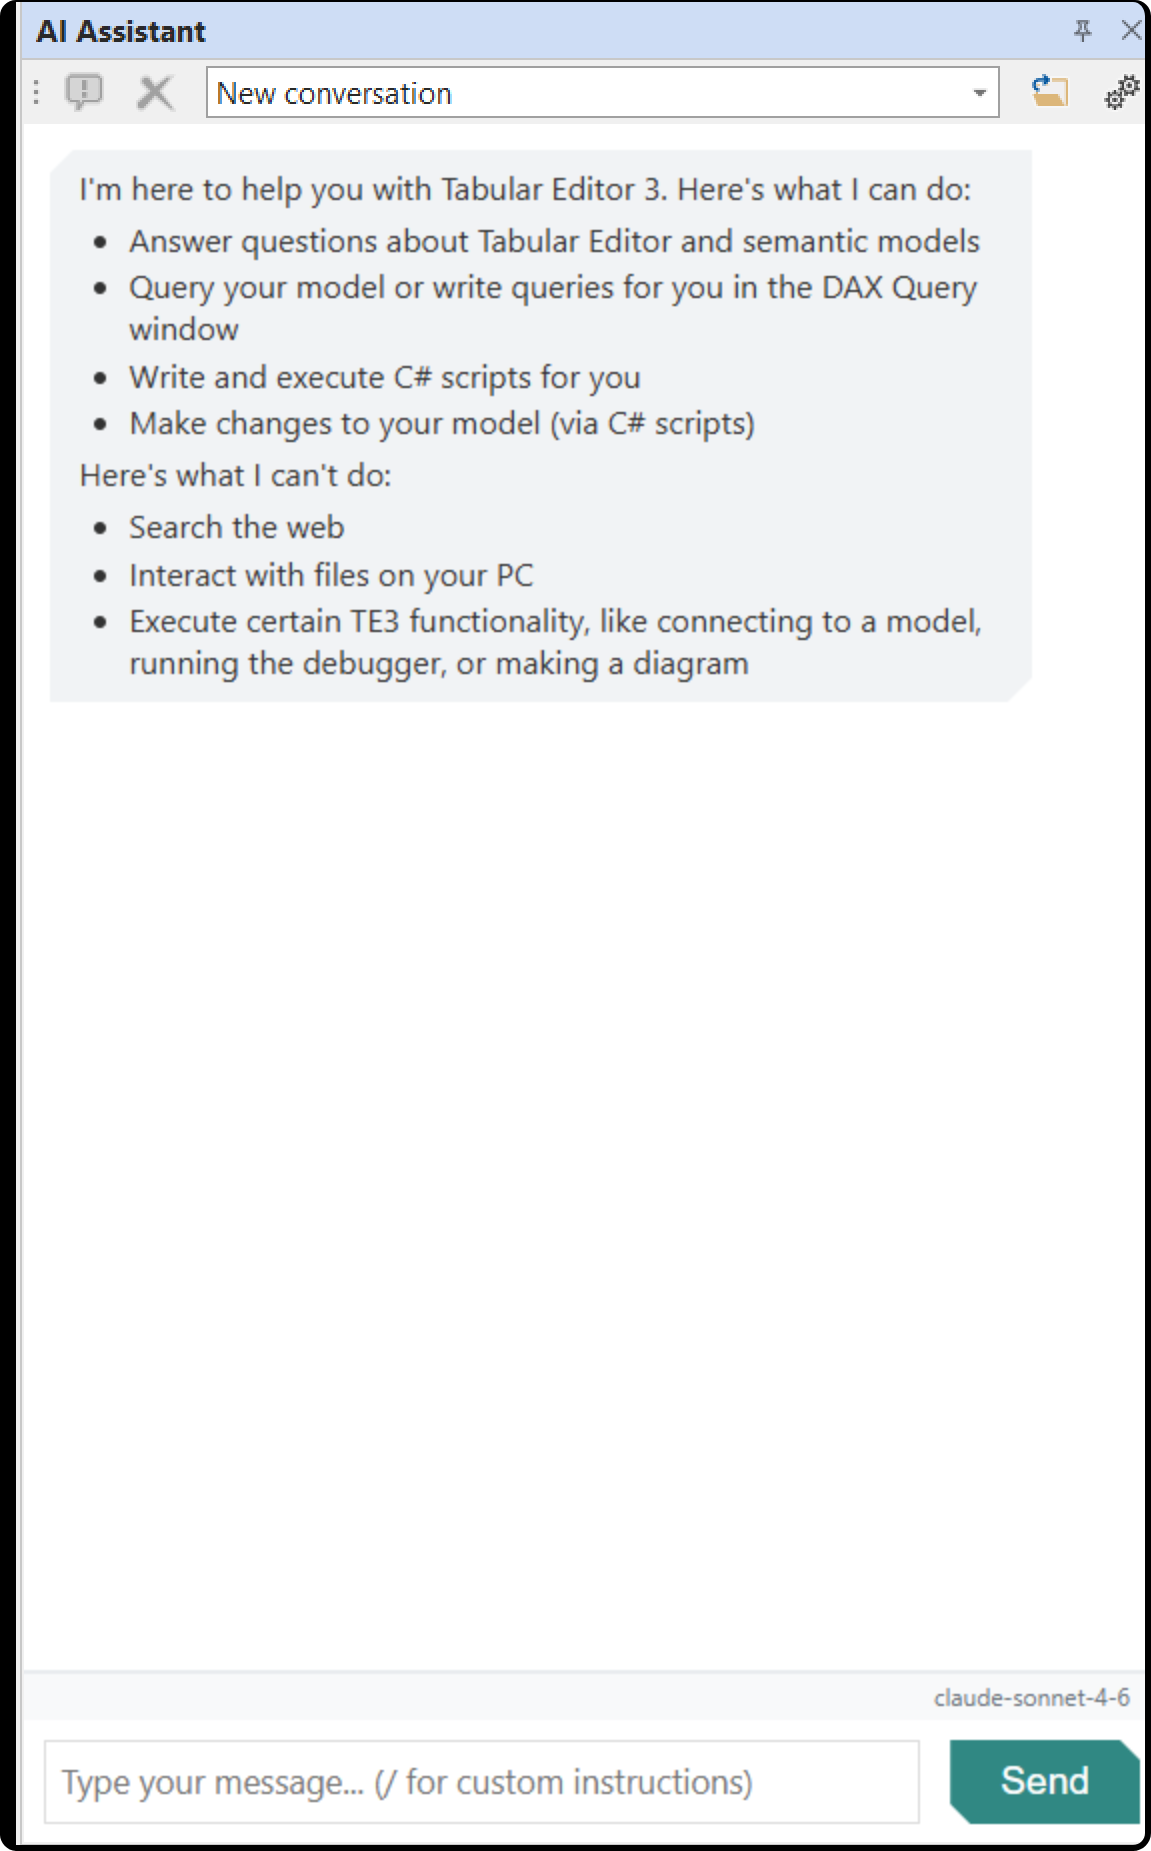
- Open the AI Assistant panel from View > AI Assistant
- Type a message and press Enter to start a conversation
The model the assistant is using is shown in the status strip directly above the message box. See Choosing a model to change it without leaving the chat.
Tip
Use our interactive demo of the AI Assistant to see how to set up and use it.
Note
API keys are stored encrypted on your local machine.
Supported Providers
Configure your AI provider under Tools > Preferences > AI Features > AI Assistant > AI Provider. Select a provider from the dropdown (the default is None (AI disabled) until you configure one), enter your API key and optionally override the default model.
Leave the model field blank to use the provider's default model. For OpenAI and Anthropic the defaults are listed in the table below; Azure OpenAI and the Custom provider have no default, so those two always need a value.
| Provider | Default Model | Configuration Required |
|---|---|---|
| OpenAI | gpt-5.5 | API key. Optional base URL, Organization ID and Project ID |
| Anthropic | claude-sonnet-4-6 | API key. Optional base URL |
| Azure OpenAI | None. A deployment name is required | API key, endpoint URL and deployment name |
| Custom (OpenAI-compatible) | None. A model name is required | API key and custom endpoint URL |
Choosing a model
The active model is shown in the status strip above the message box, next to the context usage bar. Click it to open a picker listing the models currently available for the configured provider; choosing one applies to every request that follows, with no dialog and no restart. The last entry, Preferences..., opens Tools > Preferences > AI Features > AI Assistant for anything not on the list.
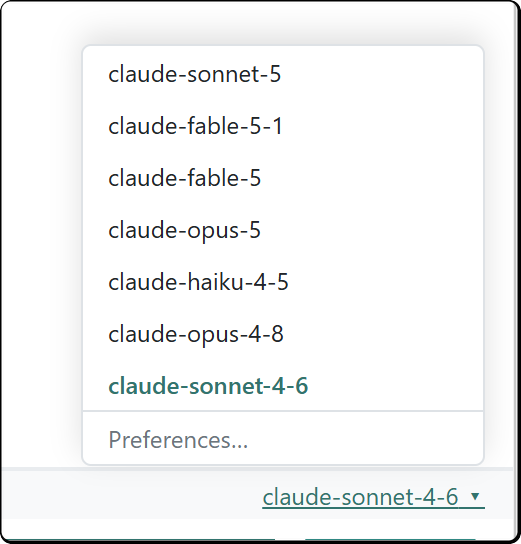
Where there is no list to offer (a Custom or Azure OpenAI deployment name, or a machine where the model list has never been retrieved), the model name is a plain link to those same preferences instead of a picker.
Note
The indicator is hidden until a provider, an API key and a model are all in place.
OpenAI
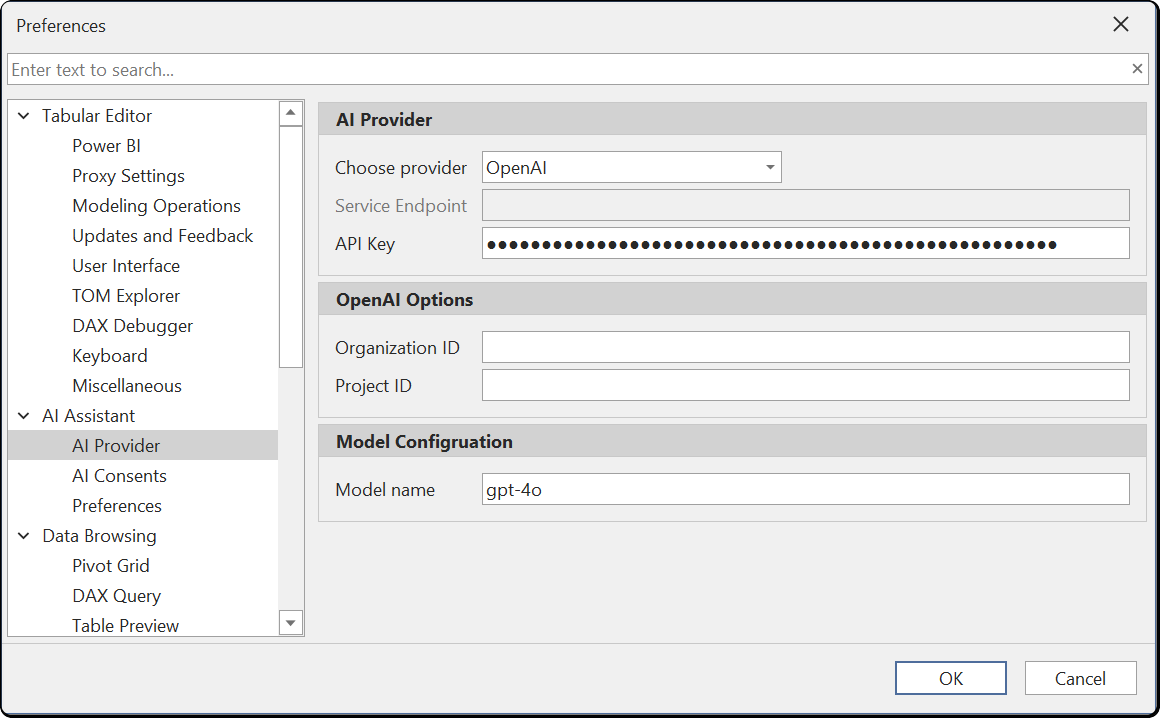
Select OpenAI as the provider and enter your API key. You can optionally specify an Organization ID and Project ID if your OpenAI account uses these. The default model is gpt-5.5, but you can change it to any model available on your account.
Anthropic
Select Anthropic as the provider and enter your API key. The default model is claude-sonnet-4-6. You can change the model name to any Anthropic model available on your account.
Important
Anthropic enforces input token per minute (ITPM) rate limits based on your account tier. A new API key starts at Tier 1 with 30,000 ITPM for Claude Sonnet 4.x. A single request against a large model can exceed this limit. Purchase $40 or more in API credits to reach Tier 2 (450,000 ITPM). See the Anthropic rate limits documentation for full tier details.
Azure OpenAI
Select Azure OpenAI as the provider and configure three fields:
- API key: the access key for your Azure OpenAI resource
- Service endpoint: the endpoint URL for your resource, for example
https://your-resource.openai.azure.com. Use the resource URL, not theprivatelinkalias; the SSL certificate is issued for*.openai.azure.comand connecting directly to*.privatelink.openai.azure.comfails certificate validation - Deployment: the deployment name, not the underlying model name and not the resource name
Azure OpenAI requires the deployment name in every API call. A deployment name is chosen when the deployment is created, so it can be any string. Deployments are often named after the model they serve (for example gpt-4o), but that is a convention, not a requirement. If you enter the resource name or a raw model name that does not exist as a deployment, the request fails.
Finding your deployment name
In the Azure AI Foundry portal:
- Sign in and select your Azure OpenAI resource
- Open Deployments (or Models + endpoints if the resource has been upgraded to Foundry)
- Copy the value from the Name column
Deployments created before your organization adopted Azure AI Foundry may not appear in the portal. List them from the Azure CLI:
az cognitiveservices account deployment list --name "<resource-name>" --resource-group "<resource-group>" --output table
See Create and deploy an Azure OpenAI resource for more details.
For 403 errors, SSL failures or "DeploymentNotFound" responses, see Azure OpenAI connection errors.
Note
The Azure OpenAI provider is for classic Azure OpenAI resources that use the api-version query parameter. If you are using the new Microsoft Foundry, see Using Microsoft Foundry below.
Custom (OpenAI-compatible)
The Custom provider option supports local or organizational LLMs that expose an OpenAI-compatible API endpoint. Enter your API key and the custom endpoint URL. This allows you to keep all data within your own infrastructure for data privacy or compliance requirements.
Using a local or organizational LLM
You can run the AI Assistant against a self-hosted LLM by using the Custom provider. This keeps all data within your own infrastructure, whether that is a model running on your local machine or a centrally hosted LLM within your organization's network. Either way, no data is sent to a third-party cloud provider.
Several tools can host models with an OpenAI-compatible API:
- Ollama: lightweight CLI for downloading and running models locally
- LM Studio: desktop application with a graphical interface for managing and running local models
- LocalAI: self-hosted, community-driven alternative with broad model support
These tools can run on a developer's workstation for individual use, or be deployed on a shared server within your organization to provide a centrally managed LLM endpoint for your team.
Example: Ollama
- Download and install Ollama
- Pull a model, for example:
ollama pull llama3.1 - Start the Ollama server (it runs automatically after installation, by default on port 11434)
- In Tabular Editor, go to Tools > Preferences > AI Features > AI Assistant > AI Provider
- Set Choose provider to Custom (OpenAI-compatible)
- Set Service Endpoint to
http://localhost:11434/v1 - Set Model name to the model you pulled (e.g.
llama3.1) - The API Key field can be set to any non-empty value (e.g.
ollama). Ollama does not require authentication, but the field cannot be left blank
Example: LM Studio
- Download and LM Studio
- Pull a model. Either through the model search page on the left panel or the CLI. For example:
lms get lmstudio-community/Meta-Llama-3.1-8B-Instruct-GGUF - Start the LM Studio server. Either through the developer page on the left panel or through the CLI. for example
lms server startNote, you will have to configure it to use OpenAI compatible mode. Additionally, you may have to change the default context size to be over 100,000 tokens. - In Tabular Editor, go to Tools > Preferences > AI Features > AI Assistant > AI Provider
- Set Choose provider to Custom (OpenAI-compatible)
- Set Service Endpoint to
http://localhost:1234/v1 - Set Model name to the model you pulled (e.g.
lmstudio-community/Meta-Llama-3.1-8B-Instruct-GGUF) - The API Key field can be set to any non-empty value (e.g.
lms). LM Studio does not require authentication, but the field cannot be left blank
Note
Response quality with local models depends on the model size and your hardware. Larger models generally produce better results but require more RAM and a capable GPU. The AI Assistant's tool-calling capabilities require a model that supports function calling in the OpenAI-compatible format.
Tip
We recommend a model with a minimum of 30 billion parameters but ideally at least 100 billion parameters. For example, the Qwen3.5-122B-A10B model performed well in our internal testing.
Using Microsoft Foundry
Microsoft Foundry (formerly Azure AI Foundry) lets you deploy OpenAI and Anthropic models in your Azure environment. These models are accessed through the OpenAI or Anthropic provider in Tabular Editor, not the Azure OpenAI provider, which is for classic Azure OpenAI resources.
Important
Do not use the Azure OpenAI provider for Microsoft Foundry models. The Azure OpenAI provider is only compatible with classic Azure OpenAI resources.
OpenAI models on Microsoft Foundry
To use an OpenAI model (such as GPT-4o or GPT-5.4-mini) deployed in Microsoft Foundry:
- In Tabular Editor, go to Tools > Preferences > AI Features > AI Assistant > AI Provider
- Set Choose provider to OpenAI
- Set Base URL to your Foundry resource endpoint with
/openai/v1appended. The URL follows one of these formats:https://your-resource.services.ai.azure.com/openai/v1https://your-resource.openai.azure.com/openai/v1
- Enter your Foundry API Key
- Set Model name to your deployment name (e.g.
gpt-5.4-mini)
Note
The base URL is not shown directly in the Microsoft Foundry portal. The portal shows a Target URI that includes the full API path (e.g. https://your-resource.services.ai.azure.com/api/projects/YourProject/openai/v1/responses). For the base URL, use just https://your-resource.services.ai.azure.com/openai/v1.
Anthropic models on Microsoft Foundry
To use an Anthropic model (such as Claude Sonnet 4.6) deployed in Microsoft Foundry:
- In Tabular Editor, go to Tools > Preferences > AI Features > AI Assistant > AI Provider
- Set Choose provider to Anthropic
- Set Base URL to your Foundry resource endpoint with
/anthropicappended, e.g.https://your-resource.services.ai.azure.com/anthropic - Enter your Foundry API Key
- Set Model name to the model identifier (e.g.
claude-sonnet-4-6)
Note
The portal shows a Target URI like https://your-resource.services.ai.azure.com/anthropic/v1/messages. For the base URL, use the part up to and including /anthropic only.
Capabilities
The AI Assistant has access to your model context and can perform the following actions:
- Model exploration: Query model metadata including tables, columns, measures, relationships and their properties
- DAX query writing: Generate DAX queries and execute them against your connected model, returning result sets directly in the chat
- C# script generation: Create C# scripts for model modifications. The assistant either opens the script in a new editor window for you to run, or carries the change out itself, depending on your settings. See Letting the assistant change your model. Model metadata changes can be undone with Ctrl+Z
- Best Practice Analyzer: Run BPA analysis, view rule violations and create or modify BPA rules
- VertiPaq Analyzer: Query memory usage statistics and column cardinality
- Document access: Read and modify open documents such as DAX scripts and DAX queries
- Knowledge base search: Search the embedded Tabular Editor documentation for answers
- UI navigation: Generate
te3://action links that open specific Tabular Editor dialogs and features
An agent connected over the MCP server is offered the same capabilities, with one exception: UI navigation is chat-only. Both surfaces can change your model by running a C# script, and both do it as a single undoable step. What differs is how the change is put to you, and how permission is settled. See What the MCP server shares, and what it does not.
Note
Tools that require an active database connection, including DAX query execution and VertiPaq Analyzer statistics, are automatically hidden when working with a model file (for example a .bim or .tmdl folder) that is not connected to Analysis Services or Power BI. The assistant still writes DAX queries for you, but the Execute button on DAX query artifacts is disabled until a connection is established. VertiPaq Analyzer statistics remain available if they were previously loaded from a .vpax file.
Letting the assistant change your model
By default the assistant writes a C# script and opens it in an editor window for you to read and run. From Tabular Editor 3.27.0 it can carry the change out itself instead.
Tick Allow AI assistant to run C# scripts directly under Tools > Preferences > AI Features > AI Assistant. The setting is off until you turn it on, and the checkbox is unavailable until Model metadata is set to Write under Tools > Preferences > AI Features > Permissions.
What happens when the assistant runs a script
- You see the change first. With Preview changes on, which is the default, the preview dialog appears before anything stands. Choosing Cancel puts the model back and tells the assistant you rejected the change, so it asks what to do differently rather than trying the same thing again. With the preference off, the change is applied without a dialog.
- One undo step. Everything the script did collapses into a single entry named C# script (AI Assistant). One Ctrl+Z puts the model back.
- All or nothing. A script that fails part way through leaves the model untouched, and the assistant reports the error rather than leaving you with half an edit.
- Only model work runs this way. A script that reaches for files, the network or an external assembly is never executed for you. It comes back as a script artifact carrying an Unsafe badge with Execute disabled, and the assistant tells you what it used.
Asking for a script rather than for the change still gives you a script. Write me a script that renames every measure to sentence case opens a script document for you to run yourself, whatever this setting says.
Administrators can prevent this entirely with the DisableCSharpScripts policy, which also stops the assistant writing scripts for you to run.
They can also allow scripting but keep it inside the model, with the BlockUnsafeScripts policy. Under it a script that reaches for files, the network or an external assembly is refused outright rather than handed to you for review, wherever it came from. See Administrator policies.
Conversations
The AI Assistant supports multiple simultaneous conversations. Each conversation maintains its own message history and context.
- Conversations persist across sessions, stored locally in
%LocalAppData%\TabularEditor3\AI\Conversations\ - Titles are generated automatically after the first exchange. You can rename conversations manually
- Auto-compaction: when the conversation approaches the context window limit, older messages are automatically summarized to free up space. A snapshot of the full conversation is archived before compaction. The threshold is set under Context Compaction, and is a percentage of the model's own context window
Deleting a conversation
Delete conversation sits at the left-hand end of the AI Assistant toolbar, next to New conversation. It asks for confirmation first.
The conversation and its history are removed from disk and cannot be recovered. To hide the AI Assistant panel instead of deleting anything, use the close button on the panel's title bar, or View > AI Assistant.
Artifacts
When the AI Assistant generates code, it creates artifacts that open directly in editor windows:
- C# Scripts: Open in a new C# script editor with syntax highlighting, compilation and execution support
- DAX Queries: Open in a new DAX query editor with syntax highlighting and execution support
Artifacts stream in real-time as the AI generates them. C# script artifacts include safety analysis that flags potentially unsafe code (e.g. file system access or network operations).
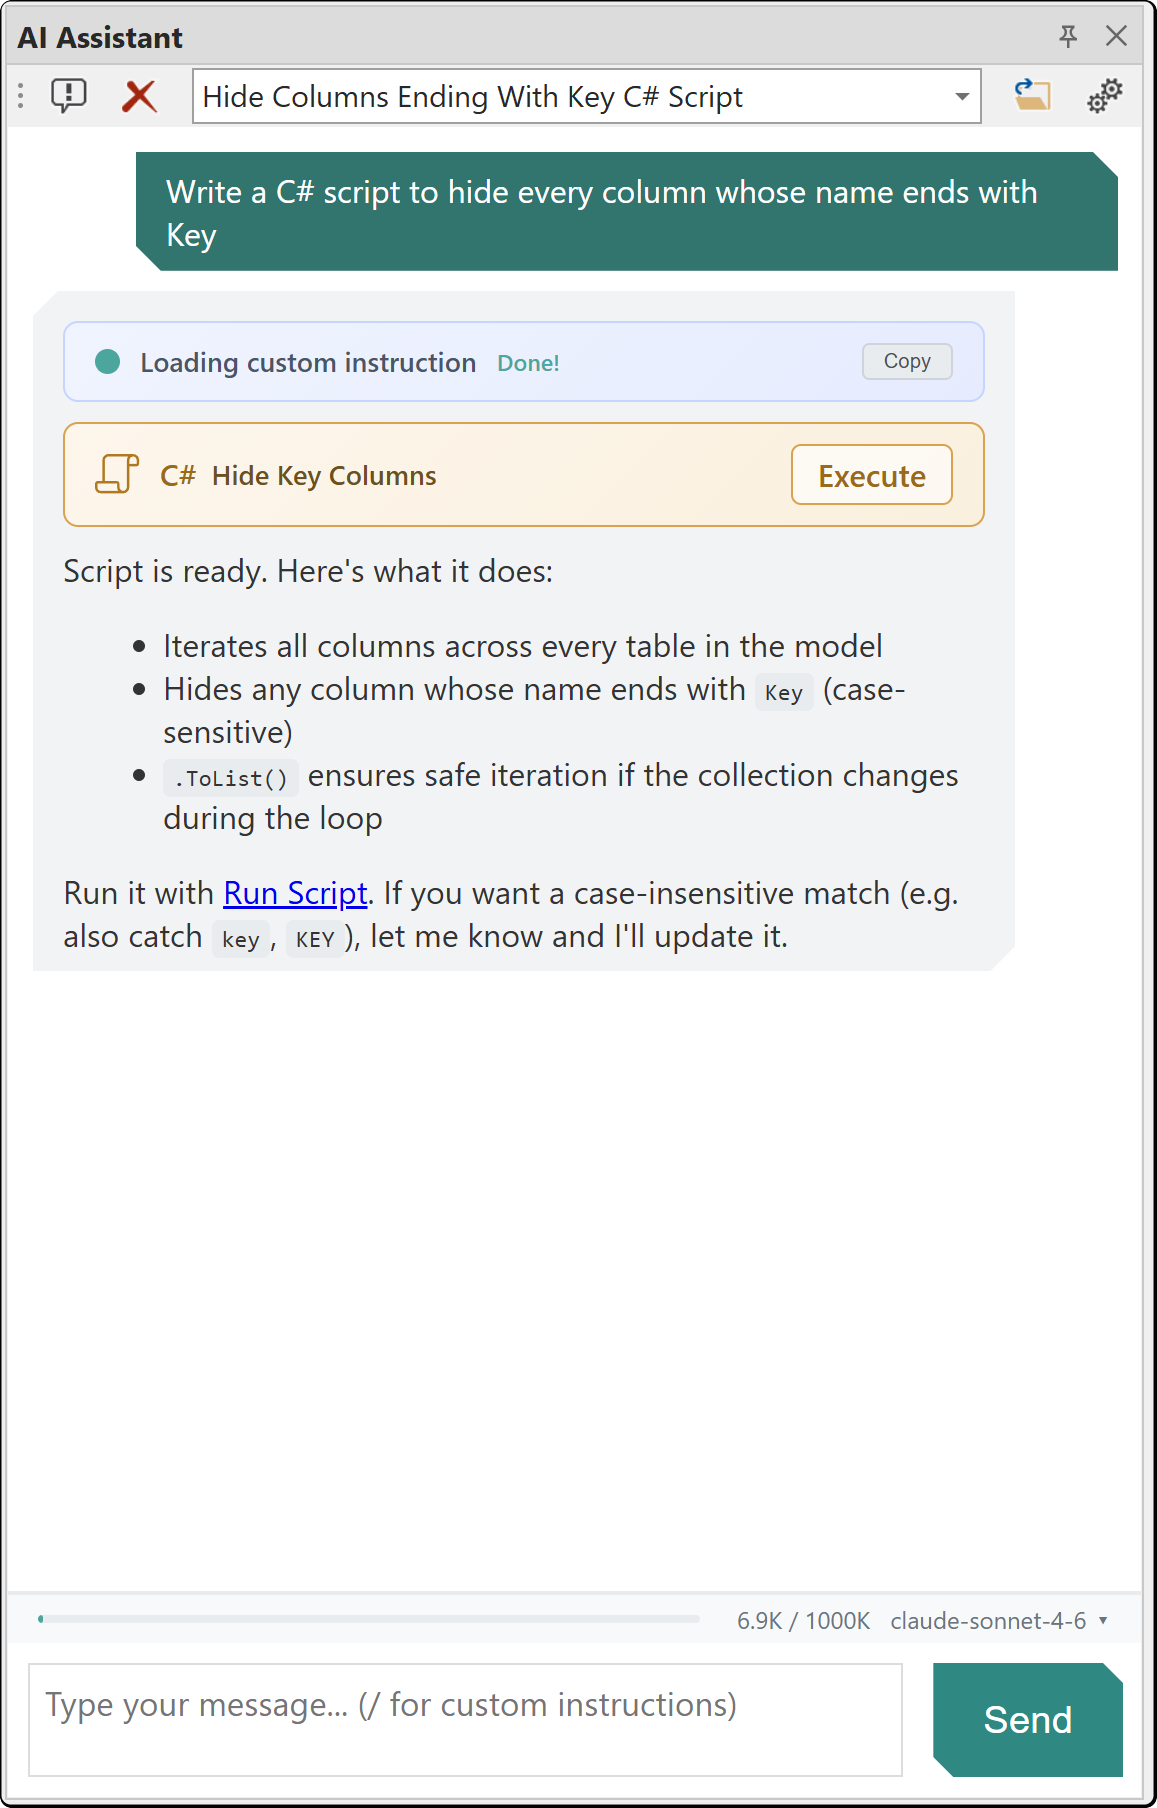
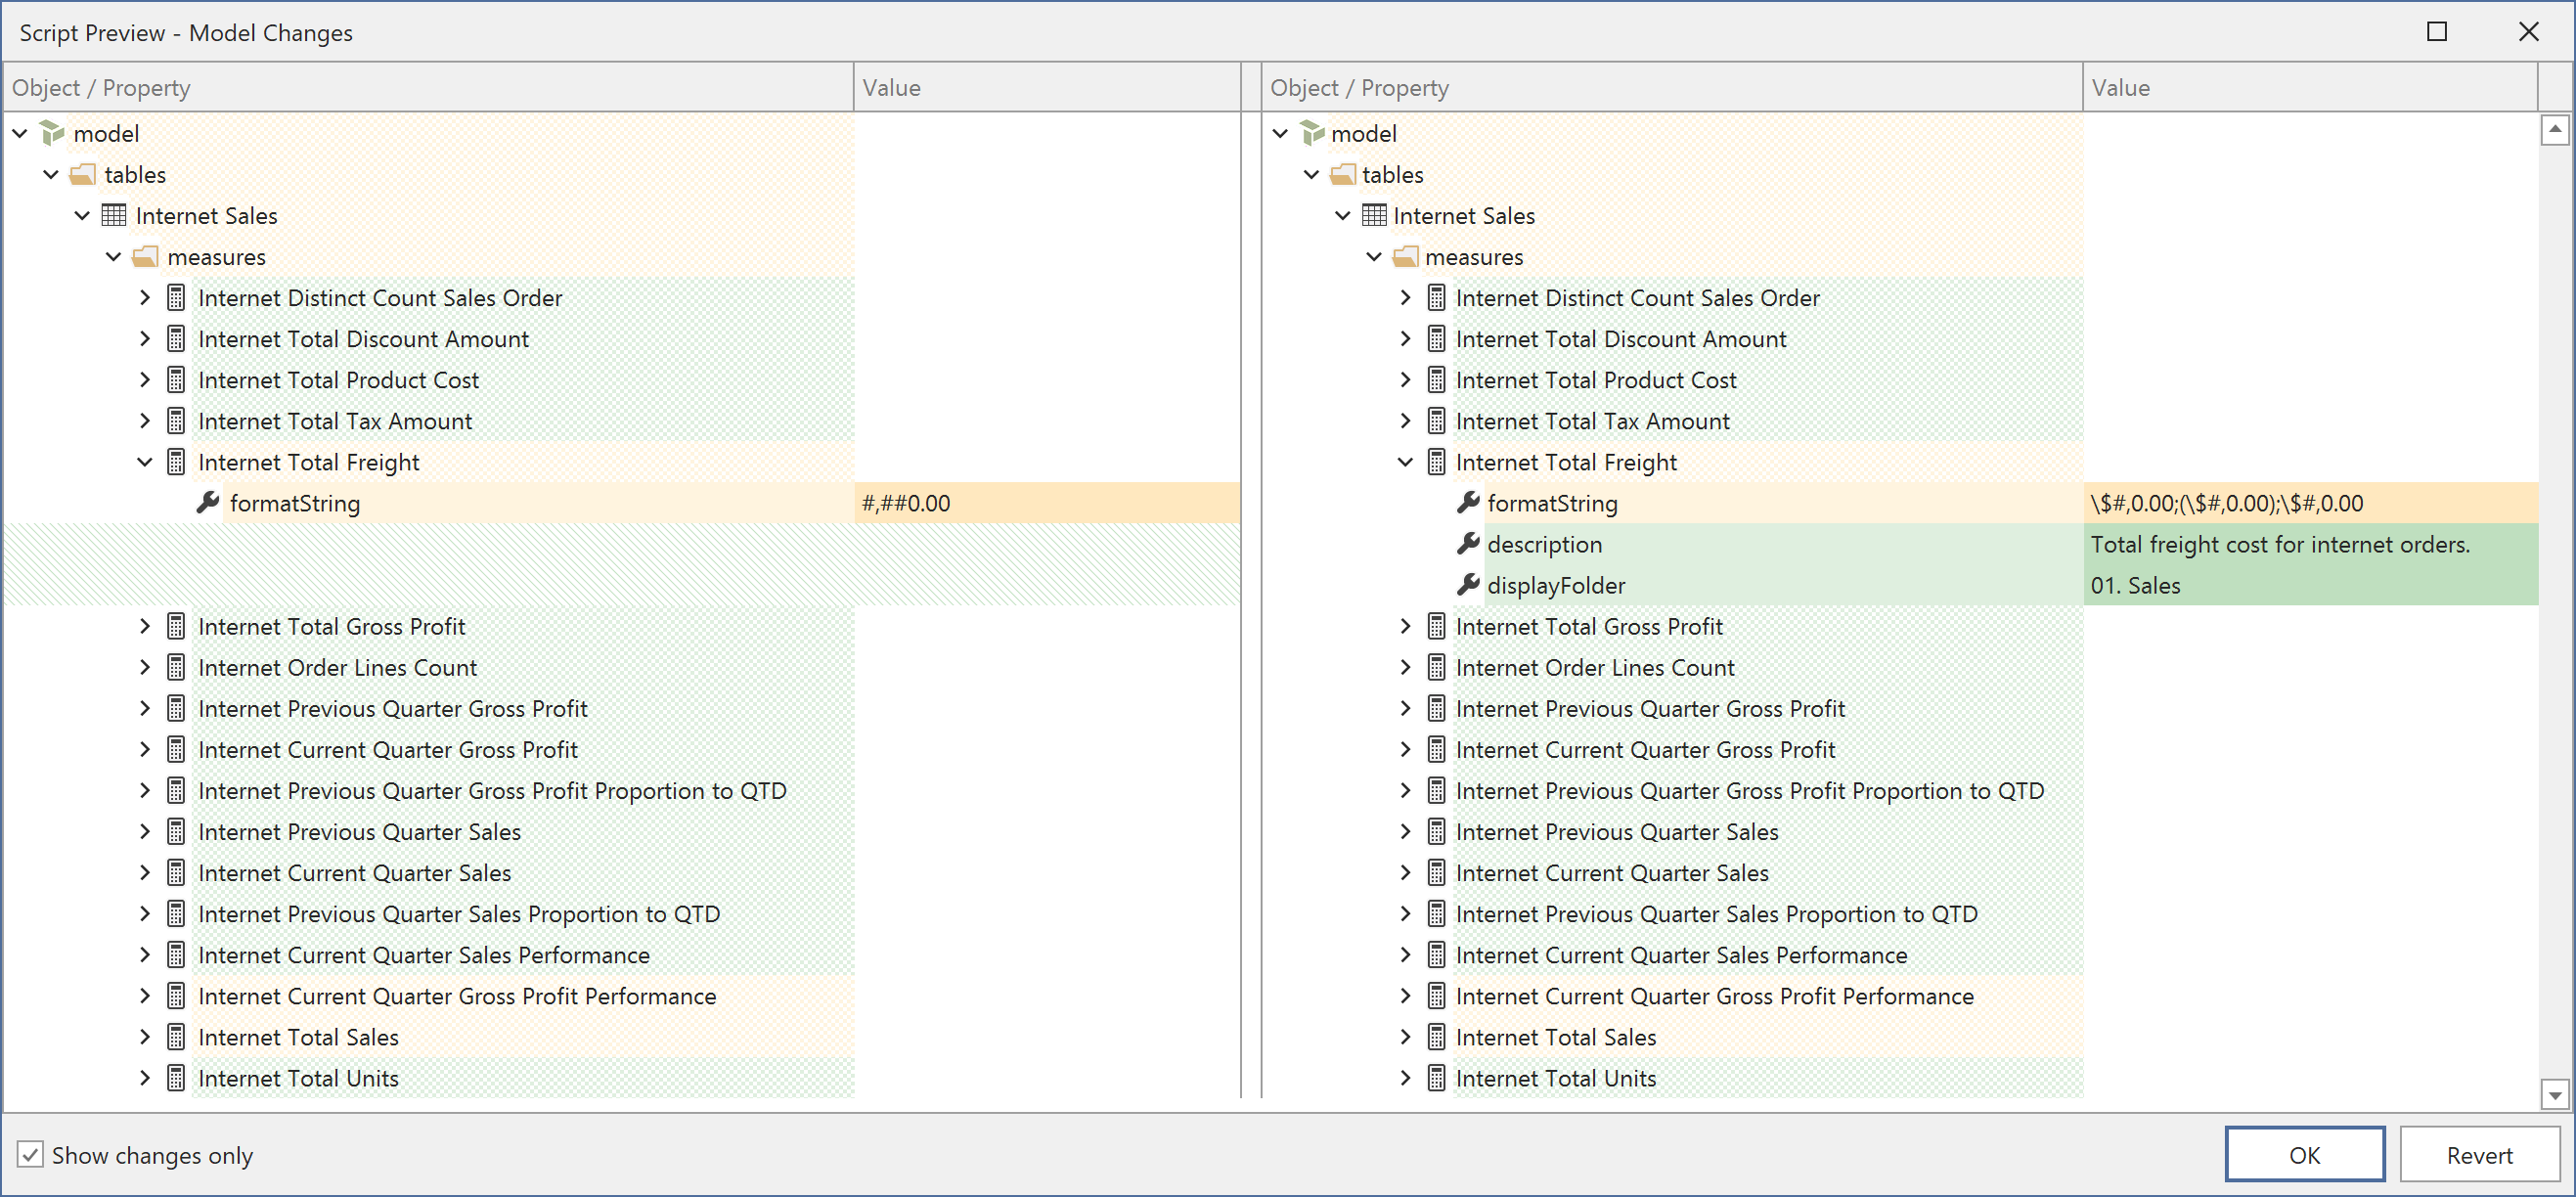
When you execute a C# script from the chat, the Script Preview dialog shows a side-by-side diff of all model metadata changes made by the script. You can accept the changes or revert them. See Running scripts with preview for details.
Custom Instructions
Custom Instructions are instruction sets that guide the AI Assistant's behavior for specific tasks. The assistant is given a list of every available instruction and only loads the full text of the ones it judges relevant to your request. Once an instruction has been loaded it stays in effect for the rest of the conversation.
Important
The description is now the only thing the assistant reads when deciding if an instruction should be used, so keep yours accurate and specific.
Built-in Custom Instructions
The AI Assistant includes the following built-in Custom Instructions:
| Custom Instruction | Invoke with | Covers |
|---|---|---|
| DAX Querying | /dax-querying |
Writing and executing DAX queries: column and measure qualification, verifying filter values, validating and updating queries |
| Model Modification | /model-modification |
C# scripts that create or change model objects: TOMWrapper API patterns, execution order, idempotent updates, naming rules |
| Semantic Model Design | /model-design |
Star schema, relationships and cross-filtering, date tables, measures versus calculated columns, calculation groups, naming |
| Semantic Model Organization | /organize-model |
Auditing and tidying model metadata: naming conventions, table groups, display folders, hidden columns, format strings, descriptions |
| Semantic Model Size Optimization | /optimize-model |
Reducing model memory and size: VertiPaq measurement, column removal, data type tuning, structural changes, SKU limits |
| Macros | /macros |
Reusable C# macros for the Macros window: selection contexts, generic-code rules |
| DAX User-Defined Functions | /udf |
Writing DAX UDFs: syntax, VAL/EXPR parameter modes, type hints, namespaces, DaxLib |
| Best Practice Analyzer | /bpa |
Reviewing violations and writing custom rules as LINQ Dynamic expressions |
Custom Instructions are shown as indicators above assistant responses, indicating which instructions influenced the response. You can toggle this display in Tools > Preferences > AI Features > AI Assistant > Preferences > Show custom instructions indicator.
Invoking a Custom Instruction
Type / to browse available custom instructions, or type the full /instruction-id at the start of your message to explicitly invoke a specific instruction. For example, /dax-querying forces the DAX querying instruction regardless of message content. If you type nothing after the /id, the assistant is just asked to use that instruction.
Explicit invocation is still worth using when you want to be certain the instruction is applied. An explicitly invoked instruction stays in effect for the rest of the conversation, just as an automatically loaded one does.
Add your own Custom Instructions
You can create custom instructions by placing .md files in %LocalAppData%\TabularEditor3\AI\CustomInstructions\. The folder is created the first time the AI Assistant runs, with an example.md file in it to copy from. Use Open Custom Instructions Folder on the AI Assistant toolbar to get there.
Each file may open with YAML frontmatter defining the instruction metadata. None of it is required:
---
id: my-custom-instruction
name: My Custom Instruction
description: A brief description shown in the autocomplete popup.
priority: 100
always_inject: false
hidden: false
---

Your instruction content goes here. This is the text that will be
injected into the AI's system prompt when the instruction is activated.
| Field | Required | Default | Description |
|---|---|---|---|
id |
No | Filename without .md |
Unique identifier, also used as /id for explicit invocation |
name |
No | Title-cased id |
Display name in autocomplete |
description |
No | Falls back to name |
Say what the instruction covers and when it applies |
priority |
No | 100 | Higher values are injected first when several Custom Instructions are in effect |
always_inject |
No | false | If true, always included in the system prompt. Such an instruction is not offered in / autocomplete |
hidden |
No | false | If true, not shown in /command autocomplete |
Custom Instructions with an id matching a built-in instruction will override the built-in version.
Notes on how files are read:
- Frontmatter must start with
---on the very first line of the file and end with a---line. If it does not, or if the YAML cannot be parsed, the whole file is treated as instruction content and every default above applies - Keys that are not in the table above are ignored. This is what makes a leftover
triggers:section harmless {{version}}anywhere in the body is replaced with the Tabular Editor AI component's version- Only
.mdfiles directly in the folder are read; subfolders are not searched
Custom Instructions from your organization
An administrator can publish a folder of Custom Instructions for everyone, with the AiCustomInstructionsPath policy. It can be a read-only network share. Those instructions load for every user in addition to the built-in ones, and they are used exactly like any other: offered in / autocomplete, chosen by their description, invoked by /id.
Where the same id exists in more than one place, the one that wins is:
- Your organization's folder
- Your own folder
- The built-in instructions
So an organization instruction overrides both a built-in one and a user's own file of the same name. A separate policy, DisableUserCustomInstructions, makes Tabular Editor ignore the instructions in your own folder altogether and disables Open Custom Instructions Folder; the built-in and organization instructions keep loading.
Both policies require Tabular Editor 3 Enterprise Edition.
Permissions and consent
What the AI Assistant may touch is governed by five resources, each carrying one access level. The same five grants govern the MCP server, so there is one place to look and one place to change your mind.
| Resource | What it covers | Levels | Default |
|---|---|---|---|
| Model metadata | Table, column and measure names, expressions, descriptions and similar. Read also covers VertiPaq Analyzer statistics | Deny / Read / Write | Read |
| Model data | Data values from your model, such as DAX query results. Requires a live connection | Deny / Read | Deny |
| Best Practice Analyzer | Read lists rules and runs the analysis; Write adds or modifies rules | Deny / Read / Write | Read |
| Documents | Your open document editors: C# scripts and DAX queries. Read is their contents; Write is needed to create or modify them | Deny / Read / Write | Write |
| Macros | Your macro library. Read lists and reads macros; Write is reserved for future macro-editing tools | Deny / Read / Write | Write |
A Write grant covers Read, so there is no need to grant both. Model data is read-only by nature (the assistant can query your data but has no way to write values back), so it offers only Deny and Read.
Note
Model data is the one resource denied by default. Metadata describes your model; data is your model's contents, so sending it to an AI provider is a decision worth making deliberately rather than inheriting from a default.
Three grants are worth a closer look:
- Model metadata > Write lets the assistant change your model. On its own, that means writing a C# script and handing it to you to run. It is also the grant that makes direct execution possible, but the assistant only runs scripts itself once you have turned that on separately. Either way, only scripts that are statically determined to be safe ever run, and a script that reaches outside the model, to the file system or the network, is never executed for you.
- Best Practice Analyzer > Read lets the assistant run the analysis, but running it also needs Model metadata > Read, since the analysis reads the model.
- Model data > Read is not sufficient on its own to run a DAX query: that needs Model metadata > Read as well, because a query can read metadata through
INFOfunctions, DMVs and the column names in its own result.
Setting the permission grants
Open Tools > Preferences > AI Features > Permissions. Each resource has a dropdown carrying its available levels.
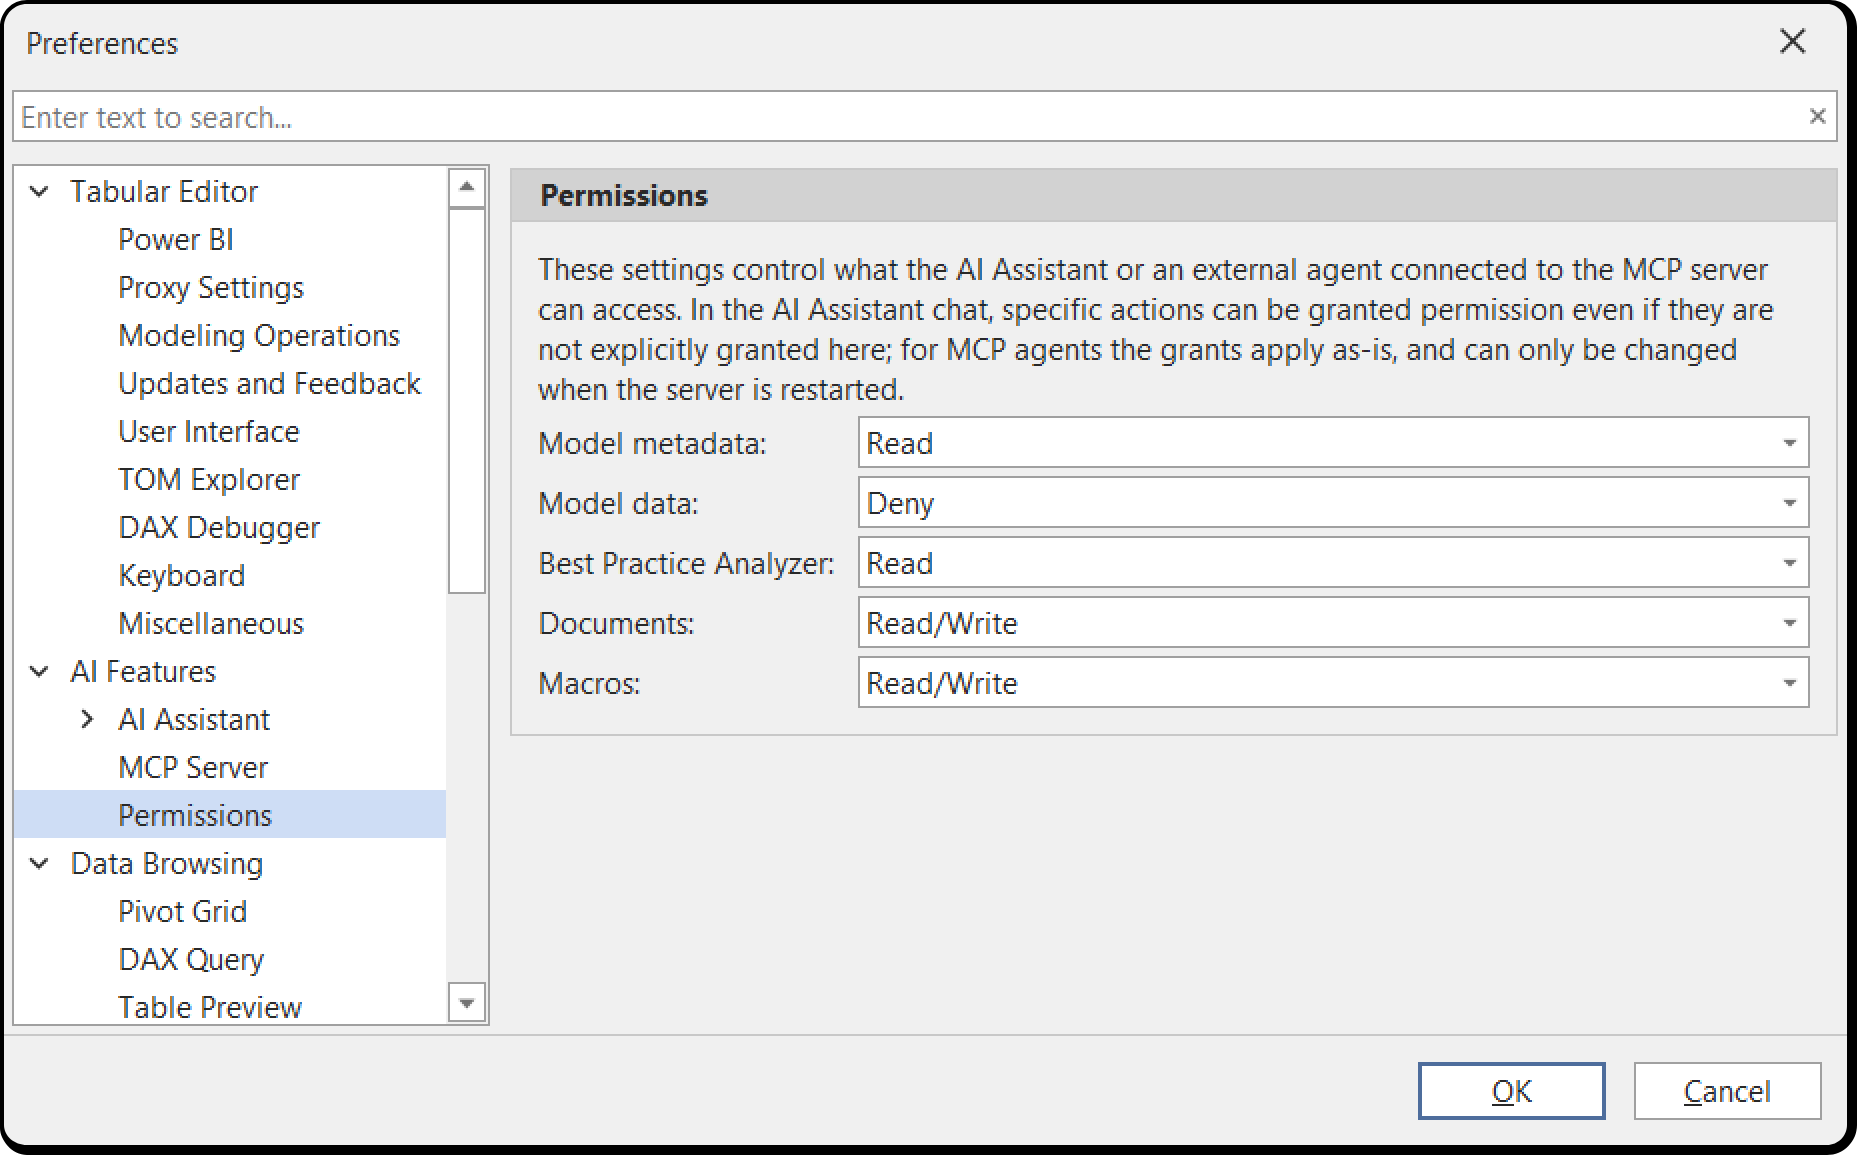
There is no separate "ask me" level. Deny is what asking looks like: in the chat, a resource you have not granted produces a permission card at the moment it is needed. Over MCP, where there is nobody to ask, a denied resource's tools are unavailable.
Note
If you used the AI Assistant before 3.27.0 you will notice fewer prompts. Model metadata, Documents and Macros now start at Read or above, so the chat no longer asks for them. Only DAX query results and Best Practice Analyzer rule edits still raise a card out of the box. Set a resource to Deny to get its prompt back.
Note
In the Enterprise Edition, IT administrators can set policies that determine these permissions. See Policies.
Permission cards in the chat
When the assistant needs a resource your standing grant does not cover, a Permission Required card appears in the conversation, naming what it wants to do, for instance "The AI would like to access the metadata of your semantic model", or the DAX query it proposes to run.
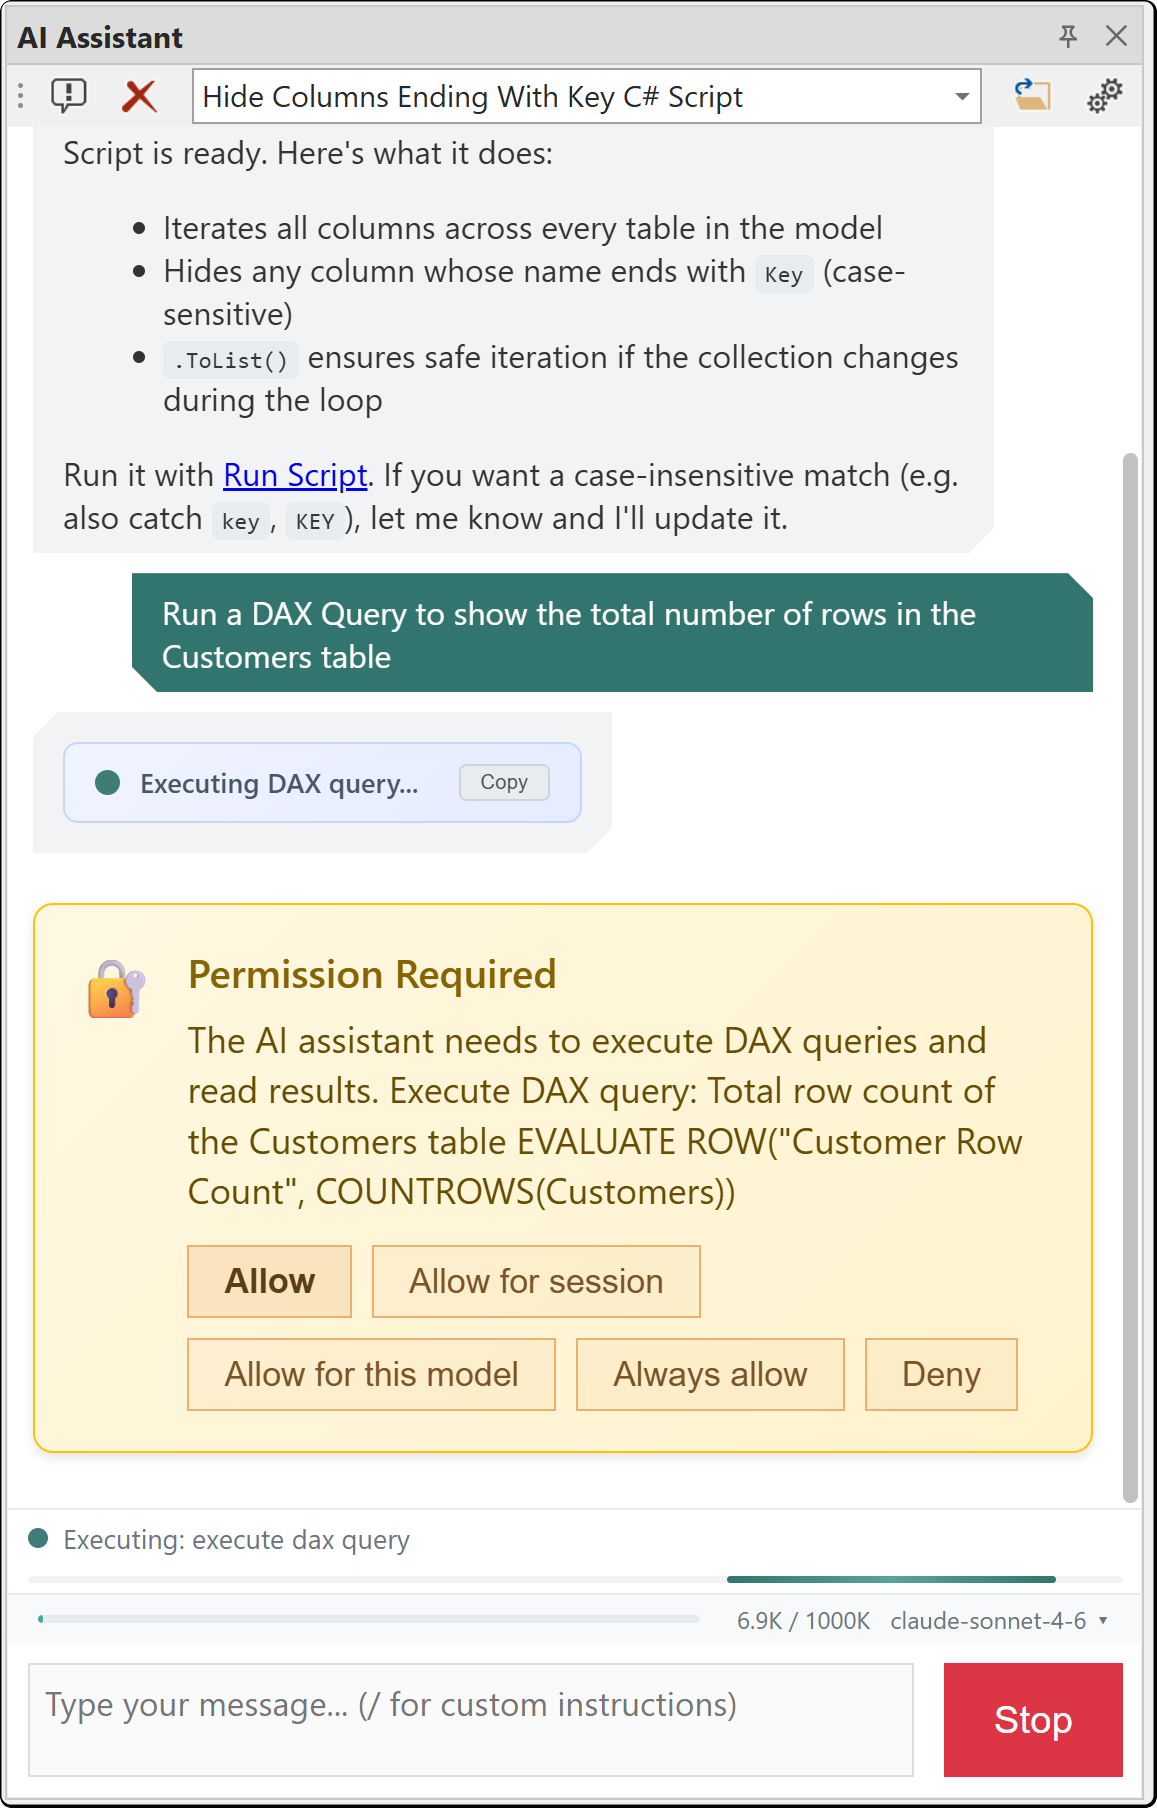
| Button | What it does |
|---|---|
| Allow | This turn only. The assistant may repeat the same request while it finishes what you asked, and nothing is remembered afterwards |
| Allow for session | Until Tabular Editor is restarted. Held in memory, never written to disk |
| Allow for this model | Recorded in the model's user options file, so it applies the next time you open this model. Offered for Model metadata and Model data only, and only while a model is loaded |
| Always allow | Raises the standing grant on the Permissions page, for every model and every session |
| Deny | Refuses this request. The assistant carries on without that access and asks again next time |
Always allow only ever raises a grant, never lowers one: allowing a read cannot narrow a Write grant you already had.
You do not have to answer the card at all. See Stopping a turn while permission is pending below.
What the MCP server shares, and what it does not
The MCP server reads the same five grants, but it does not use the card flow. An agent connecting over MCP is unattended, so there is nobody to prompt:
- Grants are snapshotted when the server starts and govern its tool surface for the server's lifetime. Changing a grant while the server is running has no effect until you restart it.
- Only the global grants are read. A grant you gave with Allow for this model, and a session grant, apply to the chat alone and never reach an MCP agent.
- A denied resource's tools are not offered to the agent at all, rather than being offered and then refused.
Withdrawing permission
Set the resource back to Deny on the Permissions page. The chat asks again the next time it needs that resource; a running MCP server keeps the access it started with until you restart it.
Lowering a global grant does not clear a per-model grant. To withdraw one of those, delete the model's .tmuo file, or the Permissions entry within it. See details in User options (.tmuo) file.
Audit record
On Tabular Editor 3 Enterprise Edition, a local record is kept of what the AI Assistant and the MCP server did: which permissions were asked for and how you answered, which tools ran and whether each one succeeded, failed or was refused, and the full text of any C# script that was run or handed to you for review. Your prompts, the assistant's replies and data values from your model are never recorded. Open audit folder under Tools > Preferences > AI Features takes you to the files.
On Desktop and Business Edition, and before a license is activated, nothing is recorded, no folder is created and the button is not shown.
See AI audit log for what each record holds, where the files live and the policies that redirect them.
Stopping a turn while permission is pending
A Permission Required card waits for an answer before the assistant can carry on. You do not have to answer it: pressing Stop ends the turn, removes the card and treats the request as denied. The panel returns to its normal state and you can carry on in the same conversation with a new message.
Preferences
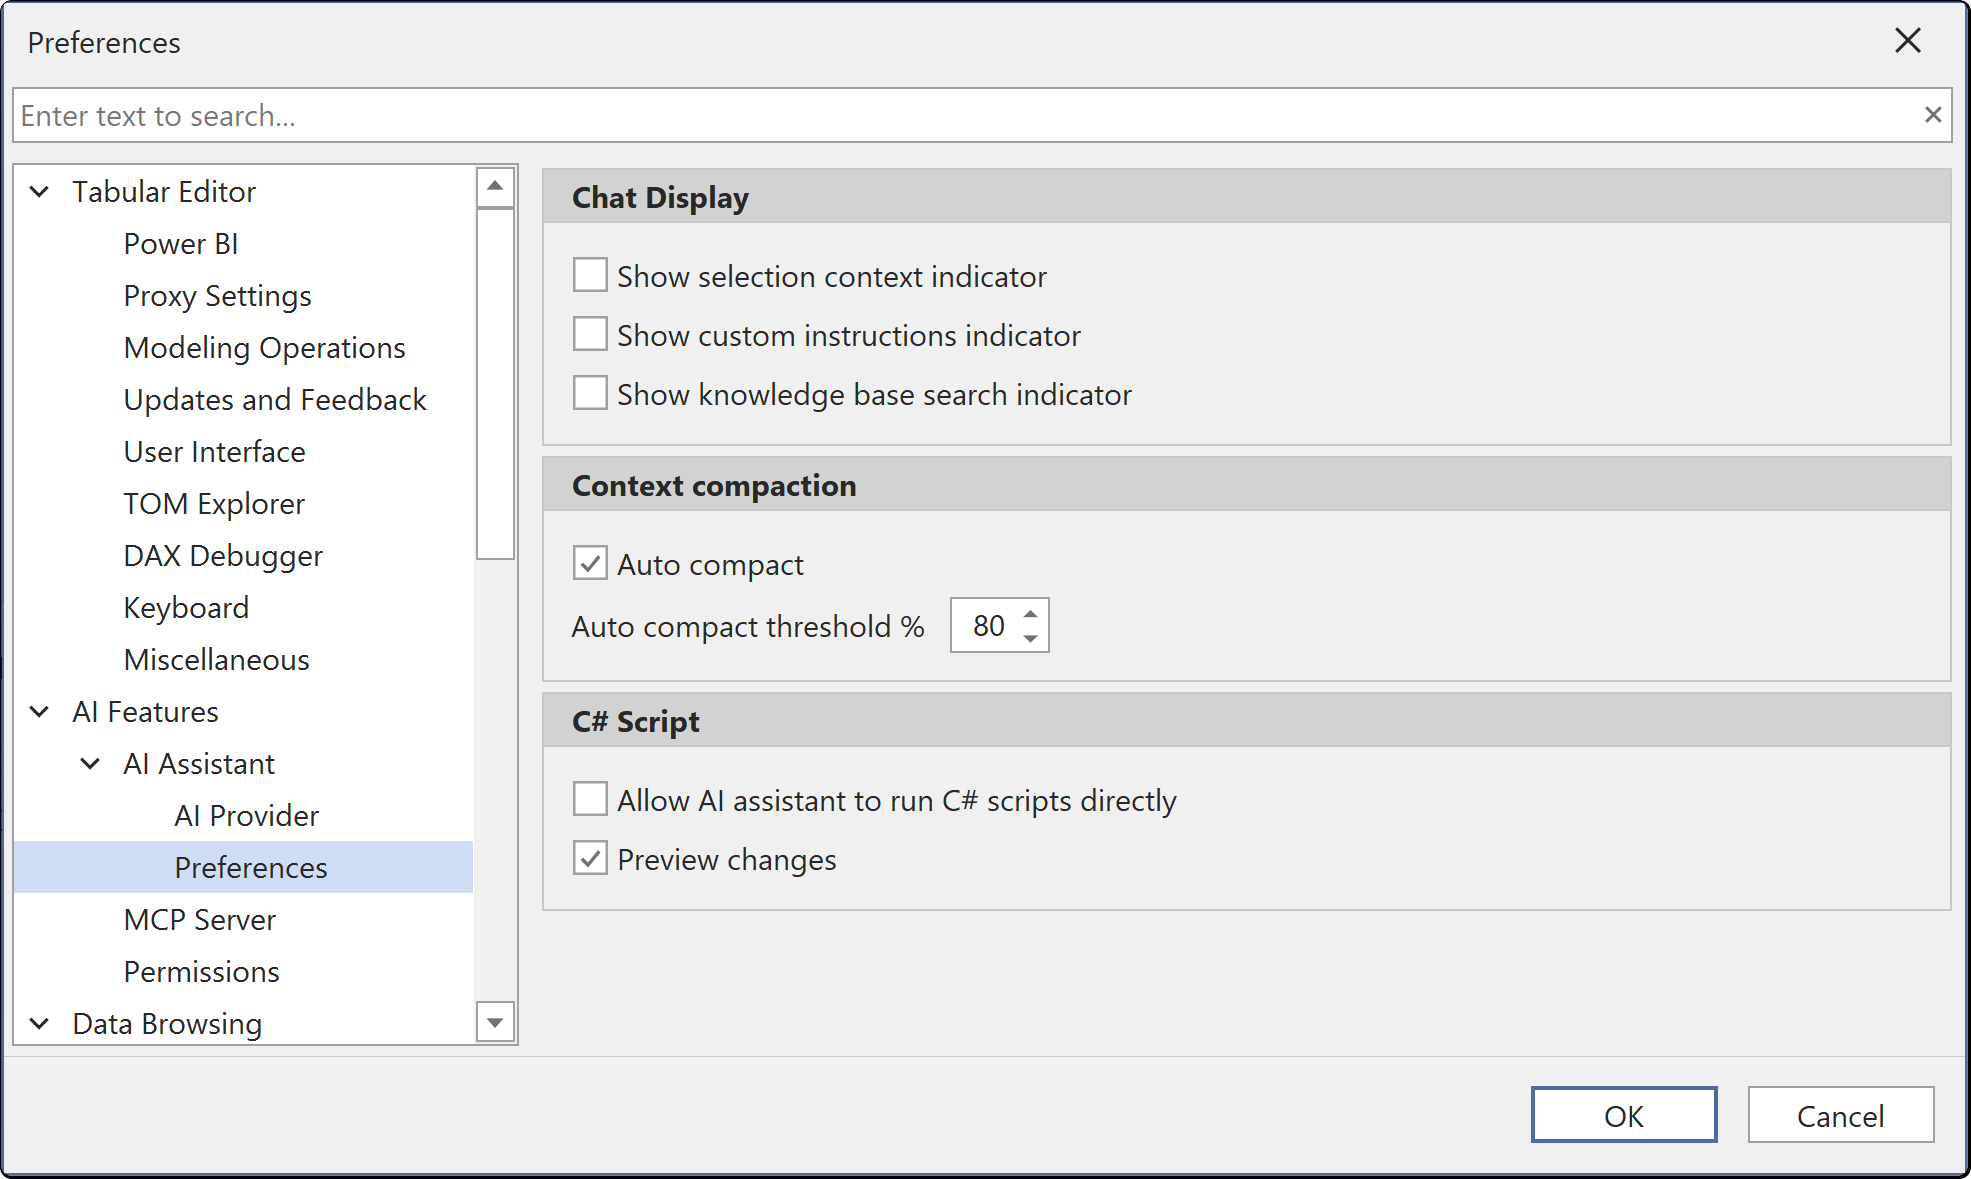
Configure AI Assistant display and behavior options under Tools > Preferences > AI Features > AI Assistant > Preferences.
Chat Display
| Preference | Default | Description |
|---|---|---|
| Show selection context indicator | true | Display the currently selected model object in the chat |
| Show custom instructions indicator | true | Show Custom Instruction indicators above assistant responses |
| Show knowledge base search indicator | true | Display progress when searching the knowledge base |
Context Compaction
| Preference | Default | Description |
|---|---|---|
| Auto compact | true | Automatically summarize old messages when approaching the context limit |
| Auto compact threshold % | 80 | Percentage of the model's own context window at which auto-compaction is triggered. Values outside 50-100 have no additional effect |
C# Script
| Preference | Default | Description |
|---|---|---|
| Allow AI assistant to run C# scripts directly | false | Let the assistant carry out model changes itself instead of opening a script for you to run. Unavailable until Model metadata is set to Write under Permissions, and unavailable entirely under the DisableCSharpScripts policy. See Letting the assistant change your model |
| Preview changes | true | Show the preview changes dialog when executing AI-generated C# scripts from the chat |
Two further settings sit on the AI Features page itself, above AI Assistant, because they apply to the MCP server as well: Check for knowledge base updates on startup, and the Open audit folder button. See Controlling preferences.
Token Usage
Each message to the AI Assistant consumes input tokens. The token cost of a single message depends on what context is included:
- System prompt and custom instructions: Sent with every message. Typically 5,000 to 15,000 tokens depending on which custom instructions are active.
- Model metadata: when the assistant needs to understand your model, it retrieves metadata through tool calls. To stay within provider rate limits on large models, the assistant uses a progressive-disclosure approach. That is, it first fetches a lightweight overview (table and measure names, relationships), then searches for relevant objects by name, description or DAX expression and only drills into full details for the specific tables or objects that the question requires. Tool results that would otherwise be very large are truncated with guidance on how the assistant can retrieve the remaining data.
Token Counter
The token counter sits in the status strip above the message box, next to the active model indicator. The bar reads used / total in thousands of tokens and is colored green, amber or red as the context fills up. A ± in front of the figure means an exact count is not available yet.
Hover over it for a breakdown in three labeled sections:
| Section | What it covers |
|---|---|
| Last turn | What the most recent exchange cost: fresh input, tokens served from the provider's prompt cache, tokens written to the cache and output |
| This conversation (billed) | The same four figures accumulated across every request in the conversation, tool round-trips included |
| Context | Tokens currently in the context window, against the window's real size |
A line reads, for example, 37,588 input + 131,744 cached · write 37,558 · output 2,866. The cache parts are left out for providers that do not support prompt caching, and a section is left out entirely when it has nothing to report.
Tip
Separating the last turn from the conversation total is what tells you whether a short follow-up question was actually expensive. A large This conversation (billed) figure next to a small Last turn figure is normal in a long conversation.
Context window
The context usage bar, the auto-compaction point and the maximum length of a single reply all follow the real context window of the model in use, not one fixed figure. A model with a one-million-token window is measured against a million tokens.
Where the model's real window is not known (an Azure OpenAI or Custom deployment name, or a machine where the model catalog has never been retrieved), Tabular Editor falls back to 200,000 tokens.
Reducing Token Usage
Select specific objects in the TOM Explorer before asking your question. When objects are selected, the assistant scopes its context to those objects instead of retrieving metadata for the entire model. This is the most effective way to reduce both token usage and API cost.
Other ways to reduce token usage:
- Ask focused questions about specific tables, measures or columns rather than broad questions about the entire model. A vague prompt such as "Set display folders on all measures" forces the assistant to retrieve metadata for the entire model. A specific prompt such as "Set display folders on the measures I have selected" limits the context to the current selection and uses far fewer tokens
- Start new conversations when switching topics to avoid accumulating long conversation histories
- Use a smaller or less expensive model for exploratory questions
Limitations
- Requires a user-provided API key. No built-in API key is included
- AI responses depend on the selected model and provider capabilities
- The usable context window is the selected model's own; where Tabular Editor cannot determine it, 200,000 tokens is assumed
- The AI Assistant is not a replacement for understanding DAX and semantic model design fundamentals
- Response quality varies by provider and model selection
- The AI Assistant cannot connect to external files, services or search the web
- The AI Assistant cannot connect to external MCP servers to extend its own tools. This is about the chat only: Tabular Editor 3 itself acts as an MCP server, so your own agent can work on the open model. See MCP Server
- The AI Assistant cannot connect to a different model from within the chat. Use the Tabular Editor user interface to change model connections
- The AI Assistant cannot manage preferences
Disabling the AI Assistant
The AI Assistant is an optional component, installed by default from Tabular Editor 3.27.0. You can modify an existing Tabular Editor 3 installation, to include or exclude the AI Assistant component, by running the Tabular Editor 3 installer again. If using the portable build of Tabular Editor 3, you can remove the AI Assistant component by deleting the file named TabularEditor3.AI.dll from the installation directory.
The AI Assistant and the MCP server ship in the same component, so excluding it or deleting TabularEditor3.AI.dll removes both. To turn off the chat while keeping the MCP server, leave the component in place and use the DisableAiChat policy.
Note
Regardless of whether the AI Assistant component is installed or not, a system admin can disable all AI functionality in Tabular Editor 3, the MCP server included, by specifying the DisableAi policy. DisableAiChat turns off the chat alone, and DisableMcpServer the MCP server alone. See Policies.